We all love those pretty fancy little images that are found on the sidebars of blogs or websites - you know the cute little social media icons or "as seen on" buttons.
I found a tutorial on creating such for a Blogger blog, but as I am ceasing use of it I thought I should create a Weebly-specific one!
I found a tutorial on creating such for a Blogger blog, but as I am ceasing use of it I thought I should create a Weebly-specific one!
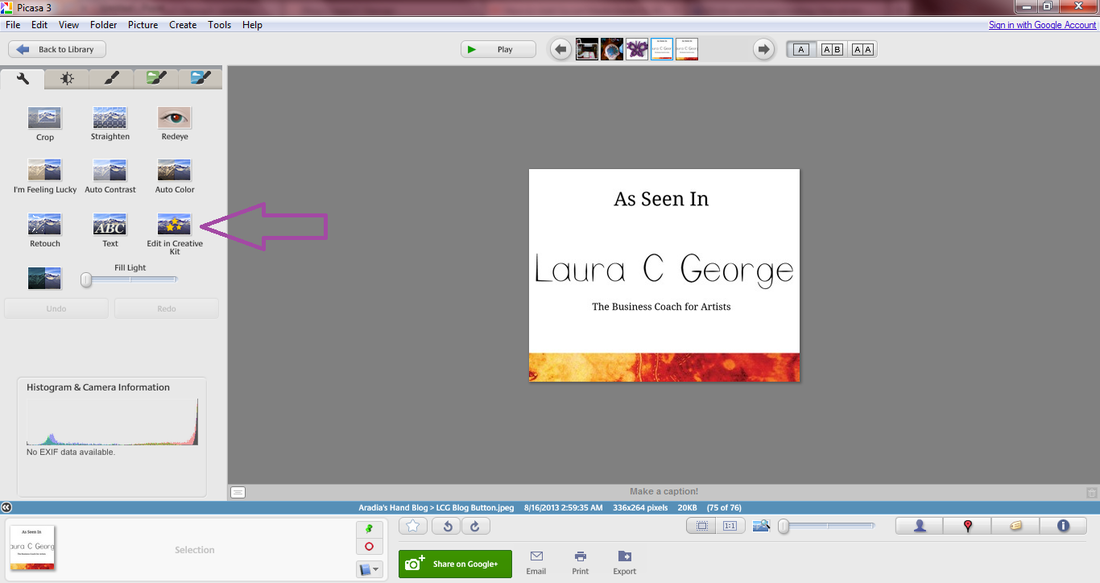
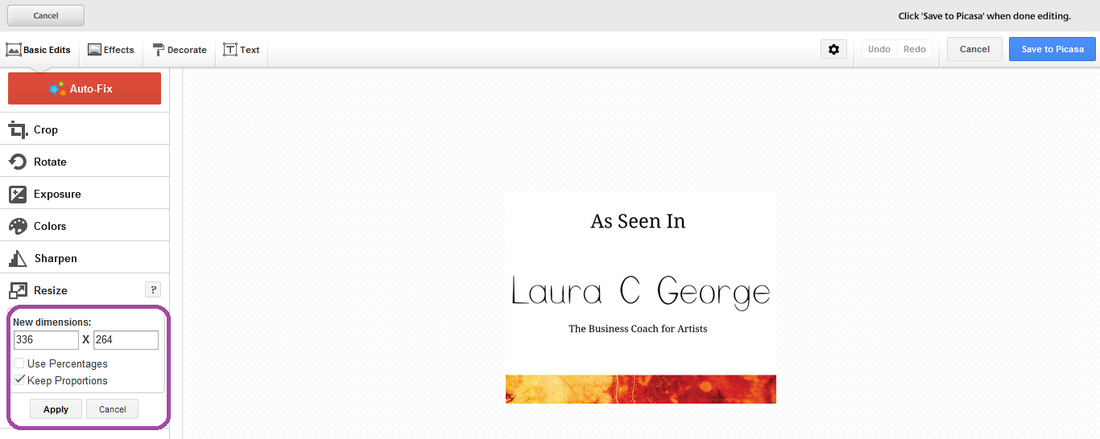
First of all, for the purposes of your blog side bar set your image width to 175px. You can do this easily by using a free photo editor such as Picasa (a Google product) and accessing their "Creative Kit" (once called Picnik). I recommend you save a copy in case you have to resize the image again.
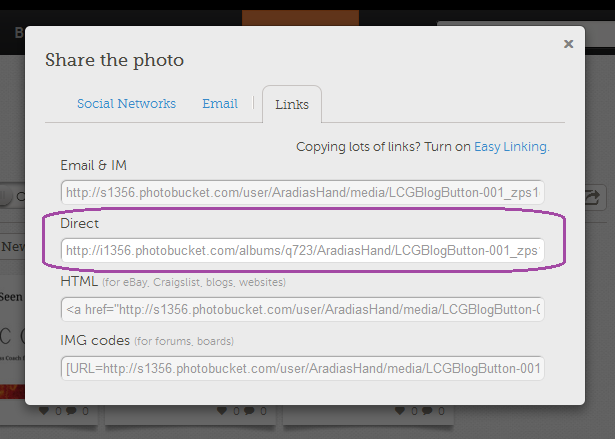
Once you have your image as desired log in to Photobucket and upload. In your library click on the gear icon and choose "Get Links".
In Weebly, select the "Custom HTML" widget. Clicking the widget input the following:
<a href="URL Goes Here"><img src="Image Direct Link Goes Here" /></a>
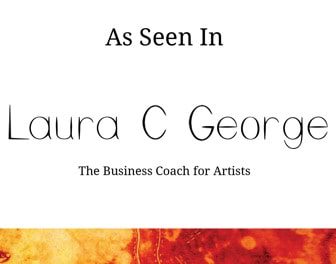
Here's what mine looked like:
<a href="http://www.lauracgeorge.com/blog/"><img src="http://i1356.photobucket.com/albums/q723/AradiasHand/LCGBlogButton-001_zps1e3db56f.jpg" /></a>
Additional Edits: If you're a stickler for design like me in many cases you can further edit your code to center it and have links open in a new page. Use this edited code with the proper links inputted (know that in some cases these extra edits may not work properly so always check!):
<center><a href="URL Goes Here"> target="_blank" <img src="Image Direct Link Goes Here" /></a></center>
You can now repeat this image loading & linking process to your heart's content! I also want to give specific thanks to Beautiful Dawn Designs for the original tutorial for Blogger!
Thank you for tuning in to my monthly tutorial (or pattern) feature! In the comments below let me know how you liked this tutorial! Was it clear?
I look forward to sharing more great tutorials like this with you in the future! If you're new to the blog make sure you follow me on Bloglovin' so you never miss a post! Join my newsletter for those special updates I *only* share with my list. And connect with me on social media for real time updates!
<a href="URL Goes Here"><img src="Image Direct Link Goes Here" /></a>
- Replace URL GOES HERE with your desired link, make sure you leave the quotations.
- Replace IMAGE DIRECT LINK GOES HERE with the link you copied from Photobucket, again making sure to leave the quotation marks in place.
Here's what mine looked like:
<a href="http://www.lauracgeorge.com/blog/"><img src="http://i1356.photobucket.com/albums/q723/AradiasHand/LCGBlogButton-001_zps1e3db56f.jpg" /></a>
Additional Edits: If you're a stickler for design like me in many cases you can further edit your code to center it and have links open in a new page. Use this edited code with the proper links inputted (know that in some cases these extra edits may not work properly so always check!):
<center><a href="URL Goes Here"> target="_blank" <img src="Image Direct Link Goes Here" /></a></center>
You can now repeat this image loading & linking process to your heart's content! I also want to give specific thanks to Beautiful Dawn Designs for the original tutorial for Blogger!
Thank you for tuning in to my monthly tutorial (or pattern) feature! In the comments below let me know how you liked this tutorial! Was it clear?
I look forward to sharing more great tutorials like this with you in the future! If you're new to the blog make sure you follow me on Bloglovin' so you never miss a post! Join my newsletter for those special updates I *only* share with my list. And connect with me on social media for real time updates!
Related Reading...

 |       |
 RSS Feed